Hey friends, Haley here!
If you have read my bio you will know that I am in my last year of college and studying Interior Design (such a random major I know). I have lived on campus for all four years at my University. As an interior design major, you can imagine how excited I get to decorate my dorm room every year and try to make it more like a home.
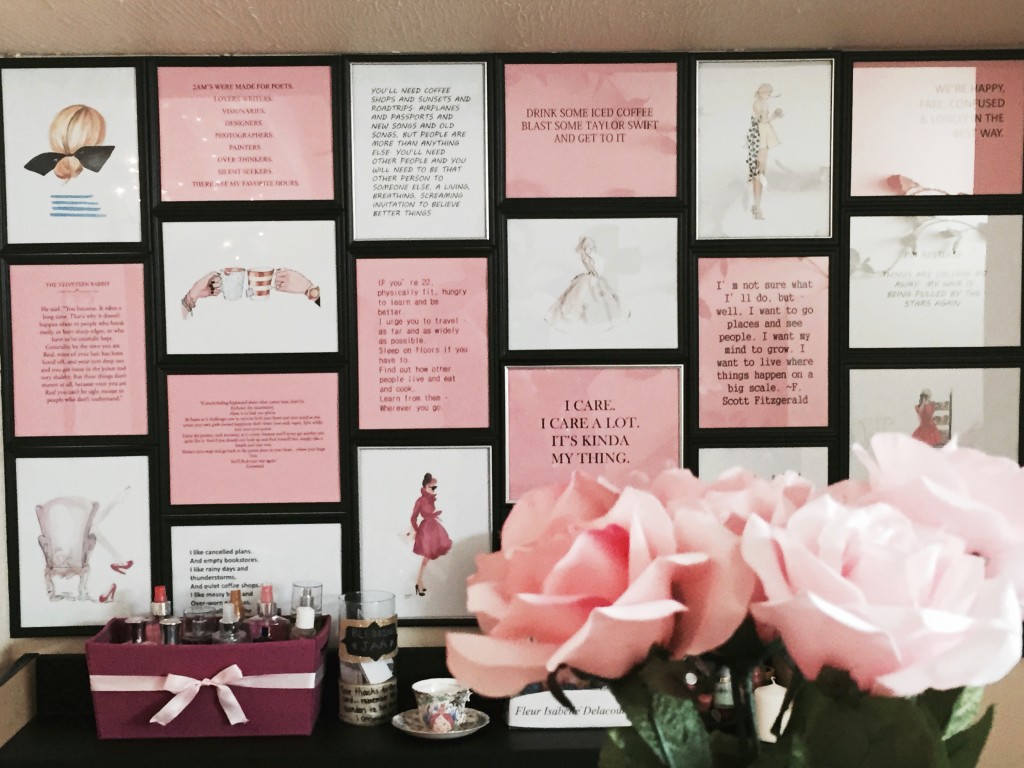
I kid you not, designing how I am going to make my dorm room my home is like Christmas morning for me (I know…such a nerd). This year, I am going for a shabby-chic and homey vibe. I want my room to feel like a home and not a traditional dorm room. To do this, I am pulling things you would normally find in a home into my room such as a nice wooden bookshelf, curtains, plants, tables and of course picture frames. A picture frame wall, I have found, is a great way for any young adult to have a cleaner and mature look, while still being able to express their interests and who they are.
Now if you are a young adult, and are like me, money is not something you have an abundance of. A DIY frame wall can look expensive, but with the help of the dollar store and some effort, I promise you it can be done for cheap.
Things you need:
•Frames
•Wall Hanging Adhesive or Velcro
•Printed photos
Step 1: Get the Frames
I recommend Dollar Tree or any other local dollar store you can find. Figure out what color or kind of frame you want. I have seen walls with different sized frames, different colored frames and even walls with all the same styled frame. I personally picked all the same sized generic black frames since what I am putting in the frames are colored. Try to steer clear of frames that have the stand in the back because it makes it harder to attach to the wall. The frames I found to be the most successful were actually the ones that have fake certificates in them. Get as many frames as you would like. I got 20 for my room because my frame wall is large.
Step 2: Pick Photos
Here is the fun part – picking your photos! Now depending on the type of look you want to go for determines what you should put in the frames. If you want your wall to look more cohesive and mature, use black and white photos. I personally am a huge sucker for inspiring quotes. I raided my “Inspiring Quotes” board on Pinterest and picked quotes that had a white or neutral background. I also picked a few sketched photos of coffee and high heels. Everything I picked is relatively neutral and soft to keep it as cohesive as possible.
Step 3: Print Photos
Depending on if you have a printer at home or not determines where you will be printing your photos. By no means do they need to be printed on expensive paper. I decided to print my photos on pastel cardstock that I got from Target for 3 dollars to give my wall a little bit of color, but printing it on white will look just as nice.
Step 4: Put the Photos in the Frames
This is pretty self explanatory 🙂
Step 5: Hanging the Frames
I recommend getting the adhesive Command Strips Velcro hanging tape from Target. Each box is around 6 dollars. Depending on how many frames you are putting on your wall, you may need a few boxes. The Velcro will go on the corners of the fames when you are about to hang them. How you hang it is all up to you. If you want a more organized look, the frames could go on straight and orderly. If you want a more relaxed look I recommend making the frames mixed between horizontal and vertical and fit them together.
Step 6: Step Back and Admire
Now just sit back and enjoy your new frame wall (trust me your friends who come over will too!)

Leave a Reply